Why do you need seat belts in the back seat?
Traditionally, seat belts were not installed in the rear seats of classic cars, but the history of accidents has shown that an unbelted passenger in the back seat is like an elephant in a collision. It kills the front (belted) passenger or driver.
It is also difficult for children who are not restrained to survive an accident.
If the rear seat belts were not installed at the factory, you can do it yourself. You need to choose rear belts marked 2105 or 2107.
Belt device
If the belt does not come out of its slot, it is most likely jammed. To fix the problem, you need to understand the principle of this element of the car. With such a breakdown, there is a high probability that it is the locking mechanism that is not working correctly. Sometimes the belt may not stretch after an accident. There is a special technology for eliminating such breakdowns.
The first step is to understand the seat belt design. There is a special element inside the locking mechanism that is responsible for fixation. It looks like a ball that moves through levers. At the same time, it clings to the gears of the coils.
The seat belt latch reacts when it is pulled out too quickly, blocking the ball. It is in this system that problems may appear over time. In this case, the belt may not stretch or, conversely, may remain locked in the fastened position.
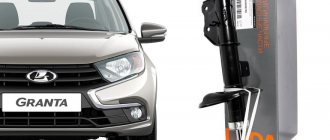
Article: 2101-2107
Order code: 013892
In stock Available for order – 6 pcs. Data updated: 05/27/2021 at 15:30
Order code
013892 Articles 2101-2107 Manufacturer SZS Catalog group: .. Cabin accessories Body Width, m: 0.2 Height, m: 0.1 Length, m: 0.4 Weight, kg: 2.56
Reviews of the product
Reviews
There are no reviews for this product yet.
Write a review
Articles about the product
- “Crystal” vases: “Classic”. Do you remember how it all began? April 16, 2013 Today, the next article in the series “Crystal VAZs or typical breakdowns of domestic cars” is dedicated to the “classics”: VAZ-2101, 2103, 2104, 2104, 2105, 2106 and 2107. These cars have been driving along our roads for decades and, despite all the shortcomings that we will talk about, their popularity is still high.
- Rear seat belt VAZ-2101-07 2 pcs. SZS Article: 2101-2107 Order code: 013892 2,750 ₽ or place an order by calling 8 800 6006 966
Availability of goods in warehouses and stores, as well as the price of the goods is indicated on
27.05.2021 15:30
.
Prices and availability of goods in all stores and warehouses are updated once an hour.
If there is a sufficient quantity of goods in the store you need, you can buy it without pre-ordering. Internet price
– valid when ordering on the website or through a call center operator by phone
8-800-600-69-66
. Subject to sufficient quantity of goods at the time of order.
Price in stores
– retail price of goods in store sales areas without pre-order.
The period for moving goods from a remote warehouse to the warehouse of an online store.
The parts data presented on this page is for informational purposes only.
1024b3c360315c92f2349af5b699773d
Add to cart
Available to order:
Order quantity:
Product successfully added to cart
!
We change it ourselves
If the RBs experienced a shock load during an accident, they must be replaced along with the winding device. The service life of these products on the VAZ 2106 is 10 years. During operation, belts rub, fray and stretch, so it is necessary to monitor their condition. They must be clean, elastic, without damage or abrasions. If defects are found, parts should be replaced.
A set of necessary tools
To install the RB on a VAZ 2106, you need to prepare:
- a set of keys:
- screwdriver;
- inertial RB;
- fastenings;
- fasteners.
You should buy RB in a vertical version. True, you will have to suffer a little with their installation.
I was driving here as usual in my VAZ 2106, with my wife and child in the back seat, the child is 5 years old, there are no seat belts in the back, well, they are not provided for by the design of my car, as a result of which I drive the child without a seat. Here I was fined 500 rubles. for an unfastened child. I tell them there are no seat belts, they say there are ones in front!
According to the old traffic rules, you cannot carry children in front, there are no seat belts in the back, so earlier I would have been right, there is nothing to fine you for!
But according to the new clause 22.9, it is now also possible to carry a child in front, accordingly, in a special vehicle. hold device After reading this paragraph, I only read that I can carry a child in the front seat with special equipment. hold device, but I still haven’t found what I have to do, and what if I don’t want to.
And if you don't want to, leave the child at home. In general, you live by the principle: if anything, we’ll give birth to another one. Carry a child on a coffin carrier and at the same time bend your fingers like a fan777
Nissan Sunny - 1997 Nissan Bluebird Sylphy - 2001 FF2 - 2010.
Skoda Yeti. FV Tiguan.
I would like to hear a specific answer to the question.
1. The belts on the rear seat are provided for 2106, as many as 3 pieces. 2. namely, that you can only carry your child in a special seat and fastened with a seat belt. Otherwise - a fine.
I agree, childhood memories, my father bought a 2106 in 1978, the belts were on the back.
There are no belts in the back, this is 100% and never happened, this is not the first car enthusiast who came up and looked, no and never was, maybe he would even put belts there, but it seems like you can’t make changes to the design of the car
+1. There was a VAZ 21063 1989 Guards, there were belts from the beginning.
What year was VAZ born? Previously, it was “fashionable” to unscrew the belts from the back so as not to have to fasten them, as if they didn’t exist.
Correct answer. Or do you think that it happens to everyone, but you are somehow special and the laws of physics do not apply to you and your child? If your child doesn’t care, take him in the trunk; in the VAZ-2106 there is plenty of space, and no one will write you fines!
Brad, I had a VAZ-2106 2000. There were no belts and they were not provided for in the design. Want to check it out? Find a fresher VAZ, something like the one I had, remove the back seat, fortunately it can be removed in a couple of minutes, and look - THERE ARE NO AND ARE NOT, no holes for fastenings, no fastenings at all, and I worked in an auto body shop for a year, and 200 % am sure that newer VAZs do not have belts, because... I have never seen them there, just like the holes for attaching them. On the old ones they were 100%, on the more recent ones they are not, never were and never will be =)
Front Panel
Some owners of “fours” modify and improve the dashboard, since the standard product has poor lighting for the instruments and glove compartment and generally does not attract attention.
Dashboard
To improve the illumination of devices or change the color of the glow, you can use LED elements instead of light bulbs.
To improve the lighting of the dashboard, you can install LED elements instead of light bulbs
In addition, modern scales are often installed to make the instrumentation more attractive and readable. For such modifications, the panel will need to be removed from the car and disassembled, avoiding damage to the indicators, and then new scales must be glued on.
The dashboard of the VAZ 2104 can be modified by applying modern scales
Glove box
All owners of the car in question are aware of the problem with the glove box lock, which creaks, cracks and opens when hitting bumps. To solve this nuance, you can install magnets from computer hard drives instead of a standard lock and control it through a limit switch.
To ensure the glove compartment closes securely, you can install magnets from your computer hard drive.
Backlight
Another nuance of the front panel is the illumination of the glove compartment. On later VAZ 2104 models, although it is provided from the factory, it has such poor lighting that there is practically no sense in it. To improve the situation, you need to purchase a lamp of suitable size (VAZ 2110 glove box illumination) and an LED.
To illuminate the glove compartment, you can install a lamp from a VAZ 2110
To install a new part, remove the glove box itself and build the lamp into it, connecting the wires to the end switch and to the standard positive wire.
After installing the lamp, the lighting of the glove compartment improves significantly
Causes of the problem
There are several main reasons why a seat belt does not extend. First of all, it should be noted the banal wear and tear of the system. Moreover, this may only apply to one of its elements; for example, seat belt pretensioners or a locking device may fail due to wear. The roller mechanism may also wear out.
Adverse weather conditions also provoke such malfunctions. Severe frost can cause this phenomenon.
Sometimes seat belt pretensioners fail after an accident. This may cause the coil lock or the entire main mechanism to break. After an accident, in many vehicles the belt may not retract back into its intended location at all. This is due to the activation of the system's squibs.
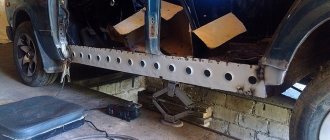
Features of replacing thresholds on Daewoo Matiz with your own hands
The Chevrolet subcompact city car was developed by General Motors and has been produced since 1997 by the South Korean division of the concern under the name Daewoo Matiz for the CIS market and Chevrolet Spark for the European Union. The concept uses thin metal for body elements, so replacing Daewoo Matiz sills is the first type of repair that drivers have to master two to three years after purchasing a new car.
The minimum cost of original replacements for Matiz for the Russian market is from 2,500 rubles. per set without installation. Manufacturers use stainless steel for the external part of the replica and profiled steel for the amplifier. Structurally, the thresholds consist of four parts:
- outer cover;
- internal amplifier;
- two connector elements.
If you install custom-made replicas, you can choose a part consisting of one part, where the connector and the outer panel are profiled to fit the dimensions of the kit. Manufacturers of custom thresholds use 1 mm steel. The cost of the set is from 3400 rubles.
On the used parts market you can purchase the sills together with the B-pillar elements. The cost of a part for one side of the body starts from 2000 rubles. When replacing elements, it is not recommended to install used parts, since the factory metal on the Matiz has not been treated with zinc and begins to rust after two years of operation.
Replacing thresholds on a Matiz is a complex repair. The simplicity of the actions is only visible in the video. Those craftsmen who are professionally involved in body conversion and repair note that the overall geometry of the car and the quality of further operation depend on the correct welding of the load-bearing elements. In addition, in order to replace the thresholds on a Matiz, it is necessary to dismantle the doors and fenders.
The Matiz body has high interchangeability. The size and characteristics of the thresholds are suitable for more than 70 car trim levels, for example:
- BYD F3;
- VAZ 2101-07;
- Chery Amulet A15;
- Citroen Saxo, S0;
- Daewoo Lacetti, KLAN, J300, J200;
- Suzuki Escudo, etc.
When reinstalling an element from another car, it is necessary to take measurements first, since the cutout does not always go through the factory welding areas.
Homemade thresholds
To further strengthen the body structure and avoid buying expensive parts, drivers make the elements themselves or have them made to order. The material used is profiled steel or a finished profile. The square pipe has a thickness of up to 1.5 mm, 80% of which undergoes industrial galvanization. This allows the body part to be highly resistant to corrosion and mechanical damage.
The repair also includes the re-equipment of the bottom; thick metal additionally strengthens the side members and jacks. Most of the work involves the use of welding. For self-repair, it is recommended to use semi-automatic welding. Gas welding requires experience; the presence of an electrode does not allow high-quality welding of metal at the junction of the threshold and the bottom.
Drivers with minimal welding experience are recommended to use ready-made replicas from trusted manufacturers. There is no need to cut the part, change the width, or use an additional connector.
Tools
For garage replacement you will need the following materials and tools:
- angle grinder or grinder:
- Screwdriver Set;
- sandpaper of abrasiveness R-80;
- chisel with a wide blade;
- electric drill;
- semi-automatic welding;
- new part;
- anti-corrosion protection;
- automotive primer.
The driver will not be able to determine in advance whether the amplifier on the car will need to be changed. You can inspect the part that is located under the outer lining only after cutting off the old element. In 40% of cases, when repairing a threshold, it turns out that it is necessary to change the central pillar, its amplifier and repair the bottom.
Before replacing the thresholds on a Daewoo Matiz with your own hands, it is necessary to dismantle some elements of the interior and body. You will need to remove:
- armchairs;
- rack trim;
- carpet can be rolled into the interior;
- dismantle the doors;
- front, rear wing;
- front facing.
A feature of the body design of the Matiz is that the wing fastening nut is located under the front trim. In order to carry out the replacement correctly and efficiently, it is necessary to dismantle both wings and install a spacer or channel between the racks. This will prevent the roof from sagging and geometry changing if, after dismantling the threshold, a rotten bottom is discovered.
The process of dismantling the old threshold step by step:
- Cut off the paintwork with a grinder, strip the part down to bare metal, and expose the factory seams.
- Drill out the spot welds with a drill.
- Use a chisel or cut out the outer part with a grinder, being careful not to touch the center pillar seal.
- Tap the amplifier, if there is significant rust, cut it out. The thickness of the factory metal on Matiz is 0.7 mm for the external part, 0.8 mm for the amplifier. If the steel has not undergone anti-corrosion treatment other than standard polymer coating, then in 98% of cases where the threshold is replaced, the amplifier must also be completely dismantled. The exception is replacement of the external panel after mechanical damage.
- Clean the seat, check the fit of the new element at the joints.
If you are involved in an accident, then after it you will not only have to carry out body repairs, but also change the deployed airbags along with the belts, or only the latter, since your car may not have airbags.
But even if you have never been in an accident in your entire driving experience, seat belts (SB) can become unusable, simply wearing out and losing strength over many years of service, after which they need to be replaced with new ones.
Below you will learn how to do this on a VAZ-2106 car.
You will need a minimum of tools: a flat-head screwdriver and a 17mm wrench or socket wrench. Well, a new belt and its lock, of course.
The diagram shows the location of the belt: number 1 is the reel, number 2 is the belt itself, 3 is the latch, and 4 is the loop.
1) Take a screwdriver and use it to carefully pry the cover on the hinge mounting bolt.
Read more: Do-it-yourself noise insulation of Renault Duster: video and expert advice
2) Remove the trim, being careful not to damage its clips.
3) Take the key and unscrew the bolt that secures the RB hinge.
4) After removing the loop, try to put it somewhere in a visible place so that the small parts associated with it do not get lost.
5) Arm yourself with a screwdriver again and remove the cover, but this time on the coil.
6) Unscrew its mounting bolt, being careful not to lose the washer and spacer.
7) Remove the coil.
Take the new belt and install it in place of the old one.
After installation, it is important to check the smooth movement of the belt so that it can be pulled out and retracted without hindrance. If there are problems with this, you need to adjust the position of the reel so that the slot in it is horizontal in relation to the belt, and not at an angle.
You also need to check whether the reel is defective: normally, when jerking, the belt should not move, but when pulling smoothly, on the contrary, it should. If the coil does not work normally, it should be exchanged for another one at the store.
Usually, along with the belt, its lock, located between the front seats, also changes.
To replace it you should:
- Remove the cover on the mounting bolt.
- Unscrew the bolt, removing the sleeve and washer, after which the lock will be removed.
- Install a new lock.
1) Use a screwdriver to pry up the cover and then remove it.
2) Unscrew the mounting bolt located at the bottom.
3) Repeat step 1 for the top fastening, exactly like step 3.
6) Then unscrew the bolt securing the hinge, and then remove it with its associated small parts.
7) Now it’s the turn of the coil bolt.
Next you need to pry up and remove the RB guide.
9) Pass the belt assembly with guide and loop through the slot in the rear pillar facing panel.
10) Dismantle it, after which you can install a new RB.
Replacing locks is done as follows:
- The back row of the back row is removed (if you have not done this earlier).
- The mounting bolts are unscrewed
- After which the locks can be easily removed and replaced with new ones.
In conclusion, it should be noted that if you also want to change all the bolts securing the hinges, locks and coils, then you should buy new ones only at a car dealership, since these are specialized parts that can withstand high loads. It is strictly forbidden to install ordinary bolts, since in the event of an accident they will be cut off, which will lead to a sad outcome.
Replace the shock absorber if shock absorber water leaks or vibration damping efficiency is lost.
Caution: Replace faulty springs only in pairs (front, rear) or as a set (all four).
Replacement
Before you start replacing the front shock absorber, take the keys “13”, “6”, “19”, “17”.
Open the hood and find the technical mounting hole for the shock absorber rod to the body. Unscrew the rod. To do this, use a wrench to stop the rod from turning at “6”, and use another wrench to slightly loosen the fastening nut. Then we remove the cushion washer and the rubber cushion itself.
We move under the car. We unscrew the two fastening nuts connecting the shock absorber bracket and the lever. We remove the nuts along with spring washers and pull out the marter through the technical hole.
Now we remove the other cushion (lower) of the upper hinge from the shock absorber.
This completes the removal of the shock absorber. Carry out all repairs and install the shock absorber in the exact reverse order of dismantling.
Driveshaft faults follow the link.
How to change
Tools and materials
shock absorbers; key at 6, 17, 13, 19;
locksmith tool.
This is completely enough to do all the work perfectly. Before it is carried out, you should think about installing the car on an observation deck or a lift. This is the only way to easily get to the element being replaced. The car must stand on wheels, and with all this, the distance from its bottom to the ground should be approximately 50 cm.
Effect of frost
Sometimes the seat belt latch may not work due to extreme cold. This will not require changing any parts. In some older vehicles, the insulation of the mechanism may not be sufficient. This causes the belt to jam.
In this case, the oil that lubricates the system becomes thicker in the cold. You will have to disassemble the coil and lubricate its elements with a special substance. It must be frost resistant. This, for example, could be silicone grease or lithol.
In some cases, the situation can be corrected by bending the metal “claw” of the ball mechanism at a smaller angle. When the coil is positioned vertically, the retainer should not come into contact with the gear teeth. This should only happen when the bobbin is tilted.
These simple steps will prevent the squib from accidentally firing. Otherwise, you may be injured during the repair process.
The coil housing needs to be opened. Most likely, the spring of the tape return mechanism has failed. This element can be replaced. It will be easier to get it out than to install it in its original place.
Seats
Comfortable driving largely depends on the comfort of the seats. If the car is old, then the seats are inevitably in a deplorable state. Therefore, many VAZ 2104 owners are thinking about installing more comfortable seats. There are many options, ranging from “seven” to foreign brands (Mercedes W210, Toyota Corolla 1993, SKODA, Fiat, etc.).
To increase the level of comfort, it is advisable to replace the VAZ 2104 seats with foreign ones
The seats from the VAZ 2107 will fit with minimal modifications. To introduce any other chairs, you first need to try them on to see if they will fit into the “four” interior. The rest of the process comes down to fitting new products, welding work and rearranging standard fasteners. If there is a need to replace the rear seat, the procedure is carried out in a similar way.
Video: installing seats from a foreign car using the example of a VAZ 2106
How to remove headrests
There are versions of the VAZ 2104, the seats of which are equipped with headrests. They can be removed if necessary, for example for repairs in case of damage or for cleaning. This is done quite simply: just pull the headrest up and the product will completely come out of the corresponding grooves in the seat back. Installation is carried out in reverse order.
To remove the head restraints, just pull them up
We change it ourselves
If the RBs experienced a shock load during an accident, they must be replaced along with the winding device. The service life of these products on the VAZ 2106 is 10 years. During operation, belts rub, fray and stretch, so it is necessary to monitor their condition. They must be clean, elastic, without damage or abrasions. If defects are found, parts should be replaced.
A set of necessary tools
To install the RB on a VAZ 2106, you need to prepare:
- a set of keys:
- screwdriver;
- inertial RB;
- fastenings;
- fasteners.
You should buy RB in a vertical version. True, you will have to suffer a little with their installation.
How to install the rear belts
To do this, you need to remove the back and rear seat, remove the rear parcel shelf by bending the clips. On the side there is a threaded connection for the seat belt reel bracket bolt.
This is where the coil with bracket is installed.
After this, the rear shelf is installed in place and the straps are threaded through the holes.
Then a loop is installed in place of the bolt with a plug in the side wall.
Seat belt buckles are installed in the corresponding threaded connections under the rear seat.
All that remains is to secure the “third point” in the threaded connection on the fender liner.
All that remains is to install the rear seat and backrest.
Lada 2107 Pensamiento clásico › Logbook › Seat belt jamming.
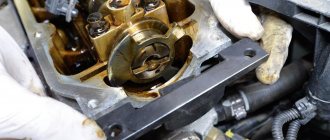
In general, I’m writing in the heat of the moment—it was in the heat of the moment that the problem appeared and I quickly fixed it. I'm sure most people experience a seat belt getting stuck. My belt was completely jammed and did not want to come out. Naturally, the time has come to deal with this problem completely. First, I unscrewed the entire belt structure, and as a result we have this thing with covers on both sides.
the cover is narrow, that’s what we’ll remove
I don’t even know what’s under this lid, it’s better not to touch it. Next, I knocked out 4 white cotter pins from the inside with an awl, they are what hold the lid. We remove the cover and see this design.
It’s this system that stops the belt. The whole problem is in the ball and its seat. The ass-handed designers did not foresee that the ball could fall out and thereby jam the plastic rocker, which blocks the stopper.
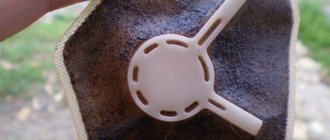
ill-fated box with a ball In general, based on everything seen, there are 3 ways to solve this problem: drill out the seat for the ball to prevent it from falling out, remove the ball completely (it will stop wedging the rocker, the belt will become loose, the lock will not work if you pull it sharply), remove the rocker and ball (the belt will become completely free without locking).
The rocker and ball have been removed
Only the ball was removed I removed only the ball and the result made me very happy. The belt began to work smoothly and softly without jamming. It remains to do the same procedure on the passenger side because my fellow travelers are constantly swearing while trying to get the belt)))
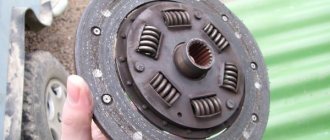
Bleeding the clutch on a VAZ 2106
Due to the fact that the VAZ 2106 is equipped with a clutch, which has hydraulics in its design, from time to time it is necessary to carry out not only routine maintenance and repairs, but also bleeding of the clutch hydraulic drive. This is due to the fact that air may enter the system during operation. The air, of course, depressurizes the entire system, which leads to adverse consequences, be it an accident or even an accident.
Among other things, air can enter the system during repair work, after replacing brake fluid, etc. That is why it is imperative to take measures to eliminate defects. After all, defects in this system that are not eliminated can contribute to the breakdown of interfaces, components and parts of the transmission.
Don’t know how to properly bleed the clutch on a VAZ 2106 with your own hands? Fortunately, there is a way out! To do this, you just need to use a practical guide, taking into account some recommendations. Naturally, to perform this operation you will need to have the necessary set of plumbing tools, hollow clean containers, an auxiliary hose, and rags.
If it is necessary to bleed the clutch hydraulic drive after replacing the used brake fluid with a new one, then, alas, it is impossible to do without cleaning the main fluid drain fitting. Therefore, you will definitely need a special brush with a steel working surface in the form of wire.
The first thing you need to do is put a rubber hose of the appropriate diameter onto the fitting inlet. Before performing this operation, it is recommended to clean the inlet from dust and dirt deposits. The second end of the hose is directed into the tank to receive brake fluid (used). It should be remembered that the connecting hose must be placed on the fitting with some tension.
Article on the topic: How to check current leakage on a car with a multimeter
Unfortunately, it is impossible to do without outside help when bleeding the hydraulic clutch.
Why is it this way? The answer lies on the surface! Help will be required during subsequent operations directly inside the vehicle. Your partner will have to depress the clutch pedal about five times.
In this case, the interval between pumping should not be less than 35 seconds. If the pedal does not return to its original position, it should be returned to this position independently.
After the clutch pedal is recessed once again, the one who works with the hydraulic drive must unscrew the drain fitting using an open-end wrench. However, remember that the fitting should not be completely unscrewed. This operation is necessary to ensure that the air leaves the system (when unscrewing the fitting, the user will hear the movement of air masses coming out of the hose).
As soon as the force becomes required, you can stop performing the operation.
As a rule, the brake fluid level, when performing the above steps, does not decrease too much in the standard clutch reservoir. However, despite this, careful monitoring of the brake fluid level should be carried out. A reduction of up to 10 mm from the bottom edge of the drive capacity should not be allowed.
Article on the topic: Oil life in the engine, automatic transmission, transmission
The next step will be to increase the tightening torque of the fitting device to the maximum and dismantle the auxiliary rubber hose. Many car enthusiasts who bleed the VAZ 2106 clutch for the first time do not take into account the fact that liquid remains inside the auxiliary hose after its removal. That is why it is best to drain this liquid back into the tank.
Several ways to bleed the clutch.
So, after completing all the previous operations, you will need to top up the brake fluid into the standard tank by tightening the cap with a little force. Then we use the rags we prepared earlier and remove all the smudges. Many experienced people advise performing a visual inspection of the entire system before turning on the engine.
The last step will be to check the quality of the work. The test will consist of measuring the stroke of the piston pusher when pressing the clutch. When bleeding the clutch correctly, the stroke should be about 2628 mm. What to do if the actual parameters do not meet the requirements? You should not make unreasonable decisions. It is enough just to carry out an additional adjustment operation.
Design and operating principle
The design of the protective device in question is represented by a retractor reel, a lock and a tape. High-strength material is used to make the tape; this element is fixed to the body in several zones as follows:
- in the area of special traction with a lock;
- on the counter;
- in the threshold area.
The main purpose of the lock, in turn, is to lock the belt. This element is located near the seat. A movable tongue made of durable metal simplifies the operation of the belt; it is located directly on the belt. You can find a retractor coil on the car body pillar. Its purpose is to forcefully wind and unwind the tape. The design of the retractor reel provides for the presence of an inertial locking mechanism, due to which, in the event of a sudden stop, the movement of the belt is stopped and the person remains in a fixed position, not being able to go into free flight through the windshield.
The principle of operation is nothing complicated: the action of a coil with a blocker is based on a gear mechanism that rotates it. The closing of this mechanism occurs through a pendulum; it can have a ball or spheroid support with a lever system.
Smooth unwinding of the tape promotes rotation of the support along with the reel gear, while sudden tension leads to blocking of the flywheel.
Starter device for VAZ-2106 and VAZ-2107
On VAZ-2106, VAZ-2107 and other classic Zhiguli models, a starter 35.3708 (ST 221) is installed, which is a 4-pole mixed-excitation DC electric motor with four brushes. The starter is controlled remotely by a special electromagnetic retractable relay. The starter is connected and disconnected from the engine flywheel by a device through a ring gear.
The starter is located in the engine compartment to the right of the engine. Attached to the clutch housing with 3 bolts. A thermally insulating protective screen is installed between the hot exhaust pipe of the engine and the starter.
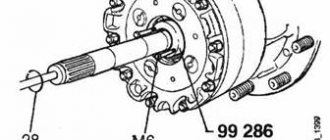
1 – generator; 2 – rechargeable battery; 3 – starter; 4 – ignition switch; P1 – pull-in winding of the traction relay; P2 – holding winding of the traction relay.
The starter covers are secured to the housing with 2 bolts. Both covers (back and front) have bronze-graphite bushings that act as rotation bearings. In them, a starter armature rotates on a shaft, from which rotation is transmitted through a drive to a flywheel mounted on the crankshaft.
What will be required for repairs?
For the reasons mentioned above, sometimes the seat belt does not extend. What to do ? Advice from experienced auto mechanics will help. First of all, you will have to disassemble the casing and remove the coil. In some models, you will have to dismantle the seats in the place where the breakdown occurred.
To do this, you need to prepare screwdrivers (flat and Phillips), as well as spanners. Their diameter should be different. You should also purchase a multi-purpose lubricant. The seats must be protected from accidental contact with oil. You will also need napkins and wire.
Repairs can be simple or more complex. In some cases, you have to completely change the coil. For some machine models, you will need to prepare special tools. But repairing a seat belt yourself will help save quite a lot of money in the family budget.
Replacing the coil
In some cases, do-it-yourself seat belt repair requires completely replacing the reel. If after these steps the tape still does not come out of the reel, this action most likely cannot be avoided.
Typical signs when the coil should be replaced are the absence of changes after cleaning this system. If, after taking it out and lubricating it with a new substance, as well as bending the metal tab, the belt still does not come out, you need to purchase a new mechanism.
For each brand of car it is necessary to select its own special type of device. Therefore, it is necessary to show the old reel in the store. This will allow you to choose the right mechanism.